
I was working on a larger bookmark test in Kittl when they released the new Kittl Mockup Studio. Naturally, I had to play with it! The bookmark I was using, a 5 × 1¼-inch U-shaped metal clip bookmark from Printify with the cut-out U-clip for attaching to pages, was presenting a lot of unique challenges. Looking the Mockup Studio over, I discovered that Kittl had plenty of bookmark scenes, but not this particular model.
Instead of giving up on the mockup, I had a moment of inspiration. Could I create a workaround for this bookmark by using one of these unrelated mockups as a starting point? Here’s how I combined Kittl Mockup Studio, the editor, and AI Remix to replace the book, add the unsupported bookmark, and create an additional background variation. I’ve added the walkthrough video below. The rest of the article will show the steps I used to get there, as well as the prompts.
Affiliate disclosure: This post contains affiliate links. If you sign up through one of these links, I may earn a commission at no additional cost to you.
What is Kittl Mockup Studio?
Kittl is an online design platform that combines AI-powered creative tools with a professional editor, mockups, templates, and other design resources in one workflow. Kittl’s Mockup Studio lets you upload a design, preview it across a library of product scenes. You can customize individual results, and either download them or continue working in the editor. For standard products, that can make creating product images extremely quick. My test became more interesting because the exact U-shaped metal bookmark I needed wasn’t one of the available products. That gave me a chance to test how Kittl Mockup Studio, the editor, and AI Remix could work together when a straightforward upload just wasn’t enough.
Kittl Mockup Studio Didn’t Have My Bookmark
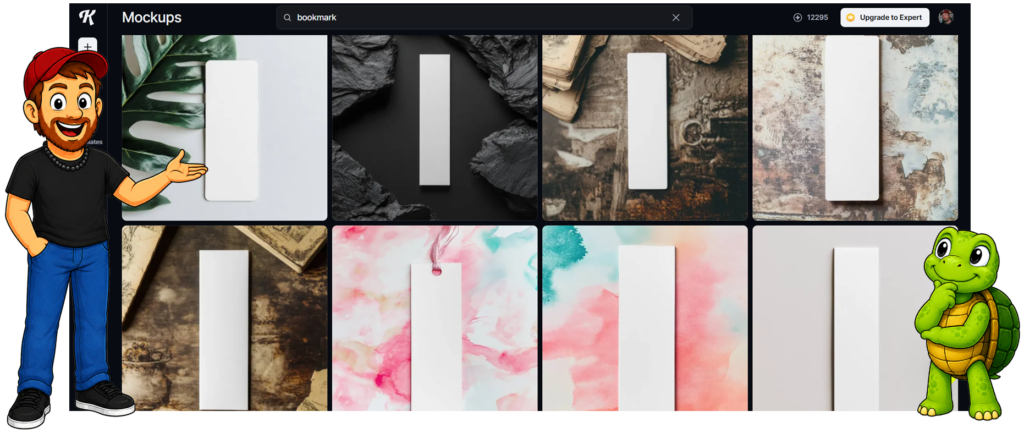
I searched for bookmarks within the studio and found plenty of them… just not the one I needed, lol. My product is a 5 × 1¼-inch U-shaped metal clip bookmark sold through Printify. Kittl had standard rectangular bookmarks, tassel bookmarks, and tag-style versions, but it skipped this particular shape. A normal bookmark gives a mockup generator one easy rectangular print area. Mine needed an opening where the surface behind it remains visible, plus believable metal highlights and shadows around the cutout.
Trying To Upload My Bookmark Directly
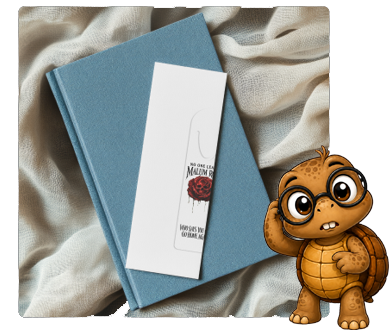
Without my actual bookmark there, my first thought was simple. I decided to try it anyway in hopes that it would replace the bookmark shown with the one I needed. Selecting a mockup with a book lying flat and a rectangular bookmark on top, I uploaded a PNG of my particular bookmark with a transparent background and selected “Use Image”. That failed for exactly the reason you’d expect. Mockup Studio treated my entire bookmark (including the U-shaped outline) as printable artwork. It placed it on top of Kittl’s existing rectangular bookmark. That confirmed I couldn’t force the unsupported product into a standard mockup by uploading it normally.
Kittl Workaround- Use Remix to Recreate Blank Mockup
In this case, the useful part of the standard mockup wasn’t its bookmark. It was the scene the image provided. A small journal, believable lighting, and an existing object were ideal for showing Remix where my bookmark belonged. Once I opened the blank mockup in Kittl’s editor, I selected the mockup board and clicked Convert to Image. That turns the special mockup object into a regular image that can be used with Remix.
So, full honesty here, lol. In my original test, I exported the mockup and uploaded it again because I overlooked the most obvious solution. That worked, but a Reddit commenter pointed out that Convert to Image removes those unnecessary steps. I even missed this as I was recording the video, so I apologize! The cleaner method is what I used in the description below.
7 Step Kittl Mockup Studio Workaround
Step 1: Open Kittl Mockup Studio
From the Kittl dashboard, open Mockups. You can upload a design immediately, but don’t do that for this workaround. We first need a scene that gives Remix the composition, lighting, and product placement we want.
Step 2: Search for the Closest Available Product
Search for the product you need. I searched for “bookmark” and chose a simple scene with a plain rectangular bookmark resting on a small journal. I avoided scenes with tassels, ribbons, hands, or anything overlapping the product.
Step 3: Leave the Generic Bookmark Blank and Open the Editor
Don’t upload the U-shaped bookmark (or whatever your product might be). Open the chosen mockup with its generic product still blank, then select Open in Editor. This will pull that blank mockup into the editor so we can use it.
Step 4: Convert the Mockup Board to an Image
Select the mockup board in the editor and click Convert to Image in the toolbar. This turns the live mockup object into a regular image that can be used with Remix. You can delete any extra empty artboard because the converted scene is all we need. This is much quicker than what I suggested in the video, so do this instead and don’t be like Mike, lol.
Step 5: Remove the Generic Bookmark and Apply the Book Cover
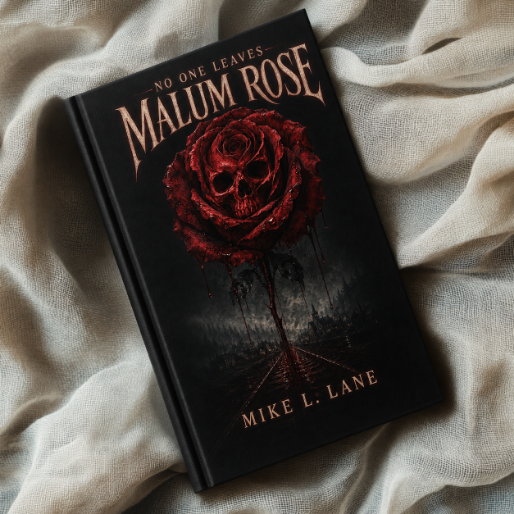
Use the converted blank scene as the base image and the flat book cover you have in mind as the reference. This step is only needed if you want a specific book cover shown. In my example, the community member I was working with was an author and wanted her actual book shown in the mockup. I found that it was better to do this step first before starting with the bookmark or trying to do everything at once. Remove the generic bookmark completely and finish the entire book before adding the real bookmark. Also, for this particular bookmark, doing the cover first matters because the U-shaped opening needs completed artwork underneath it. Here is the prompt I used to do this with Remix-
“Completely remove the plain white rectangular bookmark. Transform the entire blue journal into a finished black hardcover edition of the supplied “No One Leaves Malum Rose” book. Replace every visible blue portion of the book, including the spine, binding, cover edges and exposed corners, with matching matte black hardcover material. No blue fabric or blue binding may remain anywhere.
Apply the supplied cover image only to the front face as one complete, unchanged rectangular design. Treat it as a fixed image being professionally printed onto the cover, not as inspiration for a newly generated design. Preserve the exact original composition, proportions, title “NO ONE LEAVES MALUM ROSE,” bleeding skull rose, town and railroad scene, colors and author name “MIKE L. LANE.” Do not redraw, reinterpret, rearrange, rewrite, enlarge or crop any part of the supplied cover.
Map the supplied cover onto the book using precise four-corner perspective alignment. Lock each corner of the rectangular cover image to the corresponding corner of the visible front cover. The cover image must share the exact same top, bottom, left and right perspective lines as the physical book. Do not rotate, skew, tilt, shift or angle the artwork independently from the book.
Fit the entire cover image inside the four visible front-cover boundaries with even margins. Keep the title fully visible and centered at the top, the bleeding skull rose centered, the town and railroad scene centered beneath it, and “MIKE L. LANE” fully visible and centered at the bottom. The title, central artwork, railroad and author name must remain centered on one straight vertical axis running from the top center to the bottom center of the front cover. Maintain even visual margins on both sides. The spine must remain plain matte black with no text or artwork.
Preserve the book’s original size, position, angle, thickness, shadows, cream fabric background, lighting and overhead camera view exactly. Leave the completed book unobstructed. Do not add a bookmark or any other object.”
Step 6: Add the U-shaped Metal Bookmark Last
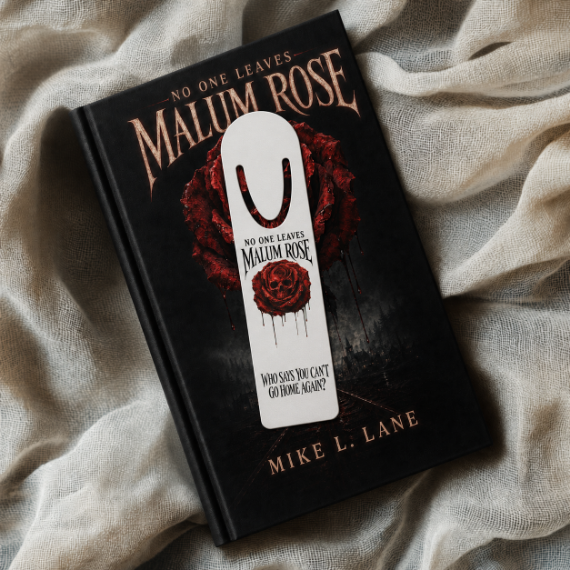
Now that you have the book with its cover created, use the finished book scene as the base and the completed bookmark image as the product reference. Adding it last gives Remix a complete cover to reveal through the U-shaped opening and helps prevent a later cover edit from moving or resizing the bookmark. As you can see in the image, the cut-out U-shape within the bookmark shows the book cover beneath. This is a great way to show the bookmark and how the matching design complements the book. I thought it was an interesting way for a self-published author to not only have another product to sell, but also highlight their own book as well. Here is the prompt I used for that Remix-
“Add the supplied white metal clip bookmark as the primary subject of the image. Reproduce the bookmark exactly, including its 5 × 1.25-inch proportions, rounded corners, white metal surface, complete printed artwork, title “NO ONE LEAVES MALUM ROSE,” bleeding skull rose and phrase “WHO SAYS YOU CAN’T GO HOME AGAIN?” Preserve all text exactly and do not crop, rewrite, rearrange or regenerate the design.
The long U-shaped cutout must be genuinely open, with the existing book-cover artwork clearly visible through it—not white, black, filled, printed or transparent to the fabric beneath the book.
Position the bookmark prominently across the center of the book cover, overlapping the cover title and rose so the bookmark is clearly the featured product. Place its top near the upper quarter of the book and its bottom above the author’s name. Make it approximately 65–70% of the book’s visible height while preserving its correct 4:1 proportions. Follow the book’s perspective but use a slight natural angle so the bookmark appears to rest on top of the cover.
Add subtle metallic highlights and a realistic contact shadow. Preserve the book cover, author name, fabric background, lighting, camera angle and composition exactly.”
Step 7: Create Background Variations Without Rebuilding the Scene
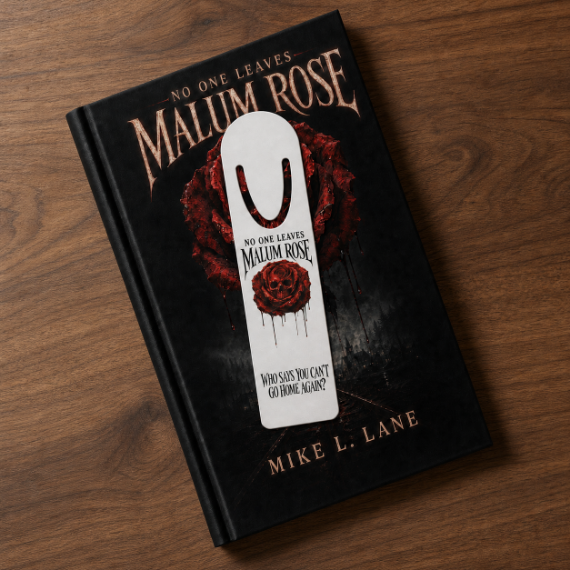
Once the book and bookmark were correct, I ran one more Remix to change only the cream fabric background. I figured this would make for a great test to ensure we could use any background in mind without changing the book or book cover. For this quick test, I decided we would swap out the fabric with a walnut tabletop. It’s always important, when using publicly available mockups like the ones in Kittl Mockup Studio, to find ways to set yourself apart. The last thing you want is to look like everyone else with your mockup images. A clean walnut tabletop created a second listing image for us without changing the featured product, as well as providing us with a more unique mockup. Here is the prompt I used for that-
“Replace only the cream fabric background surrounding the book with a warm medium-brown walnut tabletop featuring subtle natural wood grain and soft window lighting.
Preserve the book and bookmark completely unchanged, including their exact size, position, angle, perspective, cover artwork, text, colors, bookmark artwork, open U-shaped cutout, metallic appearance and shadows. Maintain the same overhead camera angle and add a realistic natural contact shadow beneath the book.
Do not move, resize, rotate, redraw, crop or regenerate either the book or bookmark. Do not add coffee, glasses, flowers, stationery, hands or other props. Keep the background clean and understated so the white bookmark remains the primary subject.”
Check the Kittl Remix Image Before Calling It Finished
Before downloading any result, be sure to zoom in and inspect the parts Kittl Remix is most likely to fake. It is a fantastic tool, but like any AI tool, small things can get missed or misinterpreted. In this case, the U must be genuinely open, the book cover should appear through it, the printed text should remain readable, the product proportions should be believable, and the bookmark needs a natural contact shadow. A good-looking scene can still be a bad product mockup if any of those details are wrong.
How Authors and Product Sellers Can Use Kittl Remix
I used a fictional book and its matching bookmark for this experiment, but the workaround isn’t limited just to authors or even this product. This same idea can be used whenever Kittl Mockup Studio doesn’t have your exact product, but has a scene set you can use. It could help print-on-demand sellers, Etsy sellers, and product designers create a scene when the closest available mockup has the right setting but the wrong product.
For authors, coordinated book-and-bookmark images could be useful for book launches, reader gifts, signed-copy packages, book boxes, website graphics, and social posts. Author merchandise is one practical use case, but the same method could apply whenever the available scene is useful, and the product inside it isn’t. So whenever you are stuck, take a look at the Kittl Mockup Studio and find ways to creatively solve your mockup problems!
Affiliate disclosure: This post contains affiliate links. If you sign up through one of these links, I may earn a commission at no additional cost to you.
The Larger Bookmark Project with Kittl
This experiment interrupted a larger project I’m building around better listing images for a Printify bookmark. That project started with the basic supplier mockups, moved into hand-held scenes, and will continue with the bookmark shown clipped to a book page. It just so happened that Mockup Studio arrived at exactly the right time and gave me another route worth testing first!
I’ll be returning to the full project soon, and will document that process here. For now, this launch-day workaround proves that a missing mockup doesn’t always mean the scene is unusable. Sometimes the closest available mockup is enough, as long as you’re willing to convert it, Remix it, and check the details carefully. With Kittl and AI, there is always a workaround!