
This Kittl video tutorial started when a member asked me to help with a reel she was trying to create. I realized it would make for a good walk-through. AI video generation is getting surprisingly good, but there’s still a big difference between asking AI to make a video and actually directing the video you have in your head. Part of her problem was trying to cram too many variables into one generated video. Instead of trying to make the entire AI product video in one generation, we broke it into the individual scenes we needed, created each one deliberately, and then combined them at the end. That gave us much more control over the final video. This Kittl video tutorial will walk you through that process and all the hiccups we encountered along the way.
For this project, I wanted to create a short Halloween-themed product promo video around a “Witch Better Have My Brew!” concept T-shirt design for a fictional shop called HexAndHops. The first thing I did was decide exactly what we wanted to happen in the final video so we could break it down into scenes.
- A friendly bartender wearing our shirt hands a tray of beer to a customer and waves at someone at the door. This is to set the scene.
- Then she rests her arm after waving, and the camera moves in for a closer look at our shirt design.
- The video finishes on a menu chalkboard where the final message magically appears, letting viewers know that this shirt is now available and where they can find it.
Instead of trying to generate that entire sequence as one AI video, I treated it more like a traditional video project. I created the individual scenes separately, gave each scene its own job, and then combined everything at the end in a free video software tool like Clipchamp or CapCut. That gave me much more control over what happened on screen.
Affiliate disclosure: There are affiliate links in this article. If you sign up for Kittl through my link, I may earn a commission at no extra cost to you.
Plan Your Kittl Video Tutorial Before You Generate
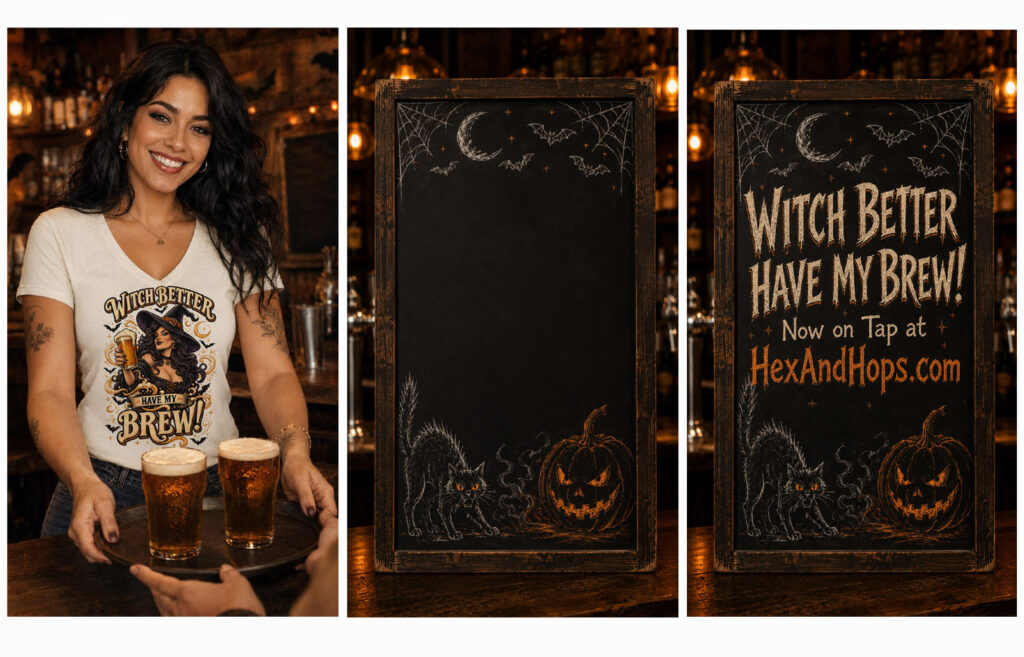
I didn’t show this in the video, but I started by creating an image with the model wearing my shirt design and the setting she was in to give us a reference image. Kittl Workflows are great for this. I wanted a Halloween-themed pub with a bartender wearing my shirt design. She would be behind the bar holding a tray of beer and handing it to a customer. This scene wasn’t really about showing the shirt yet, but about establishing the scene. I also created two other images: a blank menu board and a menu board with the chalked writing on it. We’ll get to these later.
Scene 1: Create the Opening Pub Moment in Kittl Video
Once I had the starting image I wanted, I used it as the basis for the first generation in Kittl’s AI video generator. Setting up a new project at 1080px by 1920px for a 9:16 ratio, I added the reference image. I hit Generate Video, selected Kling Video 3.0 Pro, selected 9:16, and set the time to 8 seconds. Utilizing ChatGPT, I had it generate the prompt, telling it exactly what I wanted. Here is that prompt:
“A warm, natural Halloween pub moment. The customer gently takes the tray with the two full amber beer mugs from the bartender’s hands and moves away. The bartender releases the tray, gives a flirty, confident smile with a small natural laugh, then gives the customer one subtle, friendly goodbye wave with her right hand. Immediately after that brief wave, she naturally lowers the same hand straight down and rests it flat on the bar, where it remains still for the final moment of the video. The small existing tattoo on the top of her wrist remains fixed, small, and unchanged as her hand lowers; it does not stretch, duplicate, spread, wrap around her arm, or move onto her forearm. A few tiny bubbles rise naturally in the beer and the foam settles softly as the tray is handed over. Cozy rustic pub atmosphere with warm amber lights, dark wood, and subtle Halloween décor. Realistic lifestyle-commercial movement, cheerful and relaxed. Keep the woman’s exact face, raven-black hair, body, existing tattoos, jewelry, clothing, and faded ivory V-neck T-shirt completely unchanged. Keep the complete “WITCH BETTER HAVE MY BREW!” shirt artwork exactly unchanged, fully readable, and clearly visible for the entire video. Do not alter, replace, blur, distort, crop, cover, or add anything to the shirt or its design. Keep the camera completely still: no zoom, pan, reframing, or camera movement. Keep the beer mugs and tray below the shirt design. No text changes.”
Scene 2: Use Start and End Frames for Kittl Video Product Close-Up
For the next scene, I wanted the viewer’s attention on the shirt by creating a 5-second video with a zoom-in. Rather than trying to make the first scene handle the customer interaction and perfectly transition into a close-up of the design, I created another clip specifically for that camera movement.
To do this, I needed a starting and ending frame. I exported the first video and gave it to ChatGPT, instructing it to give me the last frame as a PNG. This image would be the starting reference point for our next video, the idea being that the first video would flow seamlessly into the next by using that last frame. I also grabbed a zoomed-in image of the shirt from that frame, so I could have both a beginning and end-frame reference for the next video. Having both of these references would help guide the motion between the two points. Here is the prompt I used to get this scene rendered:
“A smooth, slow cinematic camera push-in from the starting frame to the ending close-up. The camera moves straight forward and lands precisely on the ‘Witch Better Have My Brew!’ shirt design, matching the provided end frame’s tight composition. The woman remains completely still and natural: no hand movement, gestures, body movement, head movement, added tattoos, or changes to her face, hair, jewelry, shirt, artwork, lighting, or pub background. Do not alter, blur, distort, crop, cover, or change any part of the shirt design or text. Camera movement only: one steady, elegant zoom/push-in over five seconds, ending exactly on the provided close-up frame.”
What Happened When AI Video Changed the Tattoo
I’ll be honest, my first couple of attempts at this didn’t work out, lol. The first try had the model starting with a wave and then lowering her hand. It looked great until I added the first scene and the second scene together. It was seamless, but the action seemed unnatural. She went from waving in the first scene, stopping, and then waving again in the second scene.
So I altered the prompt to have her not wave at all in the second Kittl video, but instead have her lower her arm. Again, this worked seamlessly, but AI decided to add a tattoo to her forearm that wasn’t there in the first scene, lol. So I went back to the drawing board. Instead of fighting AI, I rethought my scene selections.
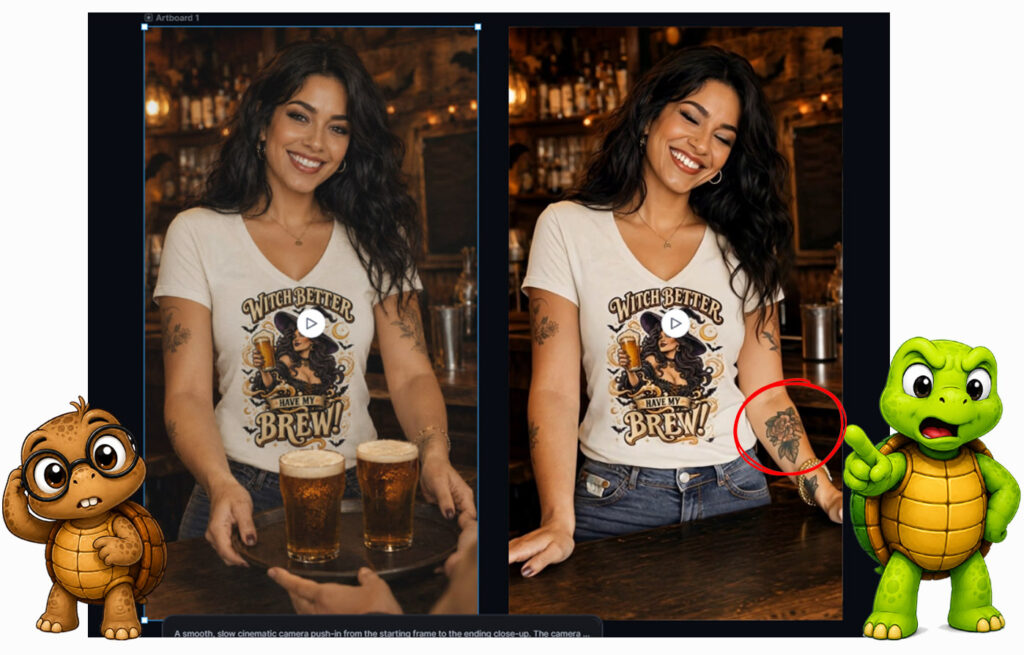
To keep AI from creating magically appearing tattoos, I made sure the first scene included both her wave and bringing her arm down to a resting position before it ended. Then, for the second scene, I had the prompt only zoom in on the shirt. This was the correct way to do it and would’ve saved me quite a few headaches had I done this from the start, lol. The prompts listed above are the final prompts I used that worked.
Scene 3: Create the Chalkboard Ending Scene
Now with these two videos ready, I started on the last scene. Using the same idea as before, I used a start and end frame. The start frame was a blank chalkboard and the end frame was the same chalkboard but with our message on it: “Witch Better Have My Brew on tap now at HexAndHops.com.” I set this one for 8 seconds, just to ensure I got enough footage, and used this prompt:
“Create a spooky, magical but realistic chalkboard-writing reveal that moves smoothly from the blank start frame to the completed end frame. Keep the camera completely still. Preserve the exact dark wood frame, warm Halloween pub background, spider webs, crescent moon, bats, scary arched black cat, evil jack-o’-lantern, lighting, and framing exactly as shown in both frames. Nothing on the board moves, changes shape, or gets redrawn except the new lettering. Grainy, dusty cream and burnt-orange chalk lettering magically writes itself onto the empty center of the board, line by line, with delicate chalk dust and a few tiny orange sparks:
WITCH BETTER
HAVE MY BREW!
Now on Tap at
HexAndHops.com
The first two lines write in bold, spooky cream chalk lettering with subtle burnt-orange shadow; ‘Now on Tap at’ writes in smaller cream chalk; ‘HexAndHops.com’ writes in bold burnt-orange chalk. End by holding on the completed chalkboard exactly as shown in the end frame, long enough for the full message to be read. No misspellings, extra words, changing text, camera movement, zoom, new objects, altered pub background, altered cat, altered pumpkin, altered bats, or distortion.”
3 Clips Turned Into a Product Promo Kittl Video
With all three clips ready (the bartender handing over the drinks, the camera moving toward the shirt design, and the animated Halloween chalkboard ending) I was ready to combine them all in Clipchamp. I placed the first scene into the editor, followed by the second clip. Playing these together worked out great and gave me the seamless transition I wanted. Because the first two scenes were created from matching visual references, they could flow together much more naturally.
I adjusted the speed on the second clip so that it showed the design a little bit longer. Then I added a small transition between the second and third clips, creating a black crossfade. Then, I extended the very end scene enough so that the viewer could see the shop link. I also added a royalty-free song to the reel to give it a little something extra. To do this, I searched through Mixkit, downloaded a track I liked, and added it to the video editor, adding an audio fade at the end.
Why I Prefer Building AI Videos Scene by Scene
The biggest advantage isn’t that AI can’t create more complicated videos, because it absolutely can. But by approaching the reel like a director, I have much more control over the final result. Breaking the project into smaller clips allowed me to control what each character was doing, when the product became the focus, the actual camera movement, the exact design I had in mind for the chalkboard, and the creative way the chalkboard is displayed at the end.
It also makes troubleshooting much easier should AI do something I don’t like. With a full-on video, there are just too many variables and it’s too easy for it to mess up. That means recreating the whole thing over and over again. But by separating into scenes, those fixes are easier to generate. If Scene 2 doesn’t work, I regenerate Scene 2. I don’t have to sacrifice a great opening and ending just because something went wrong in the middle.
Think Like a Director, Not Just a Prompt Writer
One of the most useful changes I’ve made when working with AI video is to stop thinking only about prompts. Instead, I think about shots. What should the viewer see first? Where should their attention go next? What action actually needs to happen in each clip? What should the final frame look like? What information can wait until the next scene?
Once you start thinking that way, AI becomes less of a “make this entire thing for me” button and more like another production tool. And that’s where you start getting much more intentional results.
Create Product Promo Videos With Kittl
That’s why I love using the Kittl video software. It gives you a way to take one design beyond a static product image. In this project, I used the same shirt design to build a Halloween pub scene, create separate video moments, and pull them together into a short reel that keeps the product front and center. It does take a little testing, but breaking the idea into smaller scenes gives you much more control over the final video.
If you want to create product visuals, mockups, and short promotional videos for your own designs, you should give Kittl a try.
Affiliate disclosure: If you sign up for Kittl through my link, I may earn a commission at no extra cost to you.
Where Else Could You Use This AI Product Video Method?
There are plenty of other ways you could use this same technique. A product video might use a lifestyle scene, lead into a product close-up, and then end with a call to action. A book promotion could begin with a reader holding the book, then a zoom-in of the cover, followed by a review quote for the book. A restaurant promotion might showcase food being served, followed by a pan-in of the dish, then cutting to a logo or special offer.
The specific scenes will change, but the principle stays the same. Break the idea into the moments you actually need, create those moments deliberately with Kittl video, and then put them together.